How To Build A Wheelchair Ramp!
Today we will learn how to build a wheelchair ramp. It's a practical project that is perfect for helping those in a wheelchair gain access to properties that have steps.
A wheelchair access point such as a ramp is an important and integral part of supporting those that require the use of a wheelchair because it retains an individual's independence. The use of a wheelchair ramp is also a requirement in many business and public places.
This wheelchair welding project is an intermediate project. Some feel it sits in the beginner category but we understand that it is for an intermediate welder because you have to ensure the welds are strong and the structure is sound given its usage.
Below you will find the materials and step by step requirements on how to build a wheelchair ramp.
8 Steps To Building A Wheelchair Ramp!
While this is a great project that seems to be a beginner project, the attention to detail is paramount so the ramp does not have any flaw that could cause injury while in use.
- Mig Welder
- Metal cutter
- ¼ inch (0.635 mm) plate
- 3 Lengths of 2 inch (5.08 cm) box section
Let's spring into action and create this wheelchair ramp:
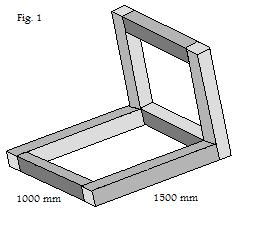
- Measure the required length and height you need for your ramp. (our measurements were 1500 x 450) Measure 3 x 1000 mm lengths of box section, 2 x 450 mm and 2 x 1500 mm lengths of box section and cut them to size.
- Lay 2 of the 1000 mm lengths as the width of your ramp and the 2 1500 mm pieces as the lengths to create a rectangle and weld these together. Now use the other two 450 mm length on one end to create an L shape and weld, finally weld the last 1000 mm piece in place at the open end of the 450 mm lengths as shown in figure 1.
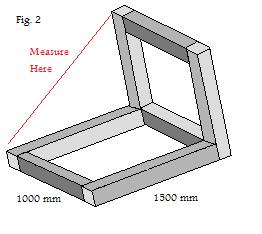
- Measure the length from the top of the L shape down to the bottom width of the rectangle as shown in figure 2. We will use an example of 1600 mm (which should be around the figure you get if you use the same measurements as us).
- Cut out three x 1600 mm pieces of box section
- Put one of your 1600 mm pieces next to your wheelchair ramp frame and review the angle required, then ct the angle on each end of the box section needed for it to be flush against the ramp frame.
- Now cut the other two 1600 mm pieces to the same standard as the first one and weld all three to the ramp frame. The first two will be on either side of the frame and the third will run down the middle for support.
- Now measure from the top of your frame down the angled box section to the ground on the end and add a few millimetres extra and use this to cut the length required for your ¼ inch (0.635 mm) plate. Cut the width of your plate to 1070 mm.
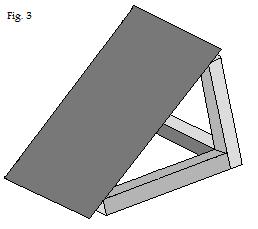
- Place your plate on to the ramp frame and tack it into place with some spot welds with your Mig welder. You can now turn the frame upside down and weld the plate fully into place. Review Fig. 3 for the full ramp.
With a little amount of time and effort you will have made many wheelchair users a lot happier as they can easily make their way through doorways that have a step without assistance helping them retain their independence.
Being in a wheelchair doesn't mean someone is not able to be independent, it simply means that from time to time they need a different support mechanism than someone not using a wheelchair and this is what the Wheelchair Ramp Welding Project is all about.


Welding Plans:
New! Welding Table
New! Log Splitter
Top Projects:


