Sheetmetal Welding Tips!
Sheet metal does not require any edge preparation like thicker plate because it melts very easily. A general rule of thumb is that if the metal is 1/8 of an inch or less it does not need to be beveled.
Common types of joints you'll find when working with sheet metal are the butt joint, edge joint, and the flush corner joint. You'll also weld lap joints if you need to repair rusty panels or sheet (see below).
A butt joint is simply where you have two pieces of metal that are flat and parallel to each other, and need to be joined.
An edge joint is where you have two or more pieces of metal that are parallel and in the same plane, usually it will be flanged.
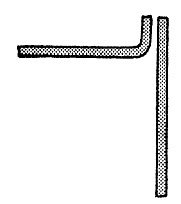
Another joint type in sheet metal work is the flush corner joint. A flush corner joint is only used on lighter sheet metal (12 gauge or lower). The reason for this is because getting good penetration is challenging and it cannot handle significant loads.
You don't usually need filler material when welding sheet metal that is thinner. And if the edges are flanged these flanged edges will melt like it was your filler metal and then fuse together as one piece that way.
Blow Through Problems MIG Welding Sheet Metal!
The difficulty in welding sheet metal is that you need to get good penetration to make a nice weld and fuse the pieces together, but the problem is that you can easily burn right through the material because it heats up very quickly as you weld.
One way to weld sheet metal successfully is to weld in short intervals (not to be confused with interval or intermittent welding).
So lets say you are welding 16 gauge sheet metal. What you want to do is adjust your amperage for this metal, but keep it on the lower side if you can. If it's too high you'll blow right through the material.
First, tack weld it together so it doesn't move on you.
When you weld thin sheet metal you want to go in short intervals because as you travel the heat transfers further down where you are welding, and when this happens your metal is already too hot when your weld arrives and you burn through.
When I say weld in short intervals, what I mean is you are going to make a weld, and then stop for a second, and the continue, stop, and continue. It's almost like tack welding, but you are constantly tacking. You could say it's like stitch welding as well but with stick welding your torch is usually at a 90 degree angle to your base metal, but when welding sheet you are going to be holding your torch at about 45 degrees so that you can see what you are doing.
The second technique is to use basic intermittent welding. First you tack weld your sheet metal or plate. Then, what you do is weld a short bead on one end of your piece, and then weld on the other end, and then move back down to another spot away from your second weld, until you finish up your weld.
This image gives you a good idea of how this works. The numbers correspond to the order you will weld. However, keep in mind you could also make number 3 or 4 your second weld, depending on the situation (see the section below for more tips and a reference for welding thin sheet or car panels).
I hope that gives you an idea as to how to weld thin sheet metal.
Want To Weld Rusty Car Panels or Sheet Metal?
If you have some rusty spots on your car and you want to patch it up well there are several techniques to doing this well.
The problem is that it is almost impossible to put two rusty flat edges together because the metal is so thin from rust and if you put the two flat edges together and try to weld them they will burn off and fall through.
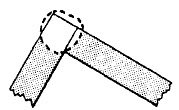
A common technique is to overlap and underlap the metal and
then weld it (this is called a lap joint).
The surface will be a little bit too high after you weld so you will tap it with a hammer and bend it down, then you will grind a bit off your weld. You don’t want to grind too much thought because you still want your weld to be strong.
There is another way to weld rusty car panel or sheet metal using a stitch welding technique and welding a lap joint. You can read about that here.
Welding Plans:
New! Welding Table
New! Log Splitter
Top Projects:


