How To Build A Metal Storage Rack!

Our storage rack plans are easy to follow, but they are not your run of the mill plans. This guide shows you how to build a storage rack (a shop worthy metal storage rack) for organizing your all your metal so it's not leaning against a wall or taking up useful space...
So you have completed other welding projects about how to build your own work bench, or even make your own English wheel, but how about storing your equipment for late use and keeping your work space tidy?
Our metal storage rack plans are classified as 'intermediate'. One would think it is an easy project, or a beginners level project, but it really is an intermediate welding project because it is not as simple as one would think. The reason why the metal storage rack project is classed as intermediate is because it is actually a heavy duty affair, not simply a small shelf in your office. This is because it needs to be durable and hold the metal delivered into your work space.
So without further talking let's get into the nitty gritty and talking about how you can build a storage rack with these step by step storage rack plans so you can improve your work space with storage space for your metal when a delivery comes.
Step 1 To Building A Storage Rack:
Before we start with the storage rack plans you will need the following equipment and metal to carry out the project:
- Angle Grinder
- Mig Welder
- 6.35 cm Steel Box Section
- 10 gauge steel sheet
- Drill and selection of drill bits
- Guillotine or bench shear
- Steel cutting circular saw
Okay now we can talk through the stages of these storage rack plans:
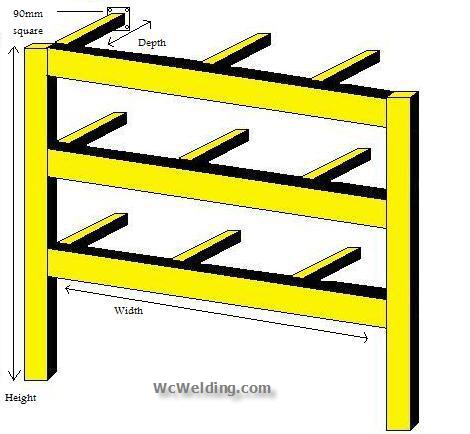
- Measure up the height, width and depth you require for your storage rack, for this exercise we will use the hypothetical measurements of height - 2000 mm, width 5000 mm and depth 1000 mm.
- Now take your box section and cut two lengths at your height measurement (2000mm in this case).
- Keeping your box section cut another three lengths at your width (5000mm in this case) and twelve lengths at your depth (1000 mm).
- Taking your 10 gauge steel sheet and cut 14 square pieces at 90mm x 90mm.
- Take your drill and drill a hole in each corner of the 14 90mm x 90mm squares.
- Using your height and lengths of box section and lay them flat on your work floor placing one length across the top of the standing height lengths, one at 500 millimeters from the top and one at 1250 mm from the top.
- Now take your welder and weld each of the box section pieces together.
- Take two of your 90mm x 90mm squares and weld these on to the bottom of your two standing height lengths, these will act as feet supporting the lengths when standing.
- Take your remaining 12 90mm x 90mm squares and the remaining depth lengths of box section and weld one square on one end of each depth length of box section.
- Taking your depth pieces of box section you can now weld these (from the end without a 90mm x 90mm square welded on) at equal intervals along your length sections of box section, for this we are using 1250 mm intervals (4 x 1250mm = 5000mm). <p>
- You should now have completed your storage rack as show below. What did you think of these storage rack plans?

Welding Plans:
New! Welding Table
New! Log Splitter
Top Projects:


